Youki
youki is an implementation of the OCI runtime-spec in Rust, similar to runc.
About the name
youki is pronounced as /joʊki/ or yoh-key. youki is named after the Japanese word 'youki', which means 'a container'. In Japanese language, youki also means 'cheerful', 'merry', or 'hilarious'.
Motivation
Here is why we are writing a new container runtime in Rust.
-
Rust is one of the best languages to implement the oci-runtime spec. Many very nice container tools are currently written in Go. However, the container runtime requires the use of system calls, which requires a bit of special handling when implemented in Go. This is too tricky (e.g. namespaces(7), fork(2)); with Rust, it's not that tricky. And, unlike in C, Rust provides the benefit of memory safety. While Rust is not yet a major player in the container field, it has the potential to contribute a lot: something this project attempts to exemplify.
-
youki has the potential to be faster and use less memory than runc, and therefore work in environments with tight memory usage requirements. Here is a simple benchmark of a container from creation to deletion.
Runtime Time (mean ± σ) Range (min … max) youki 198.4 ms ± 52.1 ms 97.2 ms … 296.1 ms runc 352.3 ms ± 53.3 ms 248.3 ms … 772.2 ms crun 153.5 ms ± 21.6 ms 80.9 ms … 196.6 ms Details about the benchmark
- A command used for the benchmark
$ hyperfine --prepare 'sudo sync; echo 3 | sudo tee /proc/sys/vm/drop_caches' --warmup 10 --min-runs 100 'sudo ./youki create -b tutorial a && sudo ./youki start a && sudo ./youki delete -f a' - Environment
console $ ./youki info Version 0.0.1 Kernel-Release 5.11.0-41-generic Kernel-Version #45-Ubuntu SMP Fri Nov 5 11:37:01 UTC 2021 Architecture x86_64 Operating System Ubuntu 21.04 Cores 12 Total Memory 32025 Cgroup setup hybrid Cgroup mounts blkio /sys/fs/cgroup/blkio cpu /sys/fs/cgroup/cpu,cpuacct cpuacct /sys/fs/cgroup/cpu,cpuacct cpuset /sys/fs/cgroup/cpuset devices /sys/fs/cgroup/devices freezer /sys/fs/cgroup/freezer hugetlb /sys/fs/cgroup/hugetlb memory /sys/fs/cgroup/memory net_cls /sys/fs/cgroup/net_cls,net_prio net_prio /sys/fs/cgroup/net_cls,net_prio perf_event /sys/fs/cgroup/perf_event pids /sys/fs/cgroup/pids unified /sys/fs/cgroup/unified CGroup v2 controllers cpu detached cpuset detached hugetlb detached io detached memory detached pids detached device attached Namespaces enabled mount enabled uts enabled ipc enabled user enabled pid enabled network enabled cgroup enabled $ ./youki --version youki version 0.0.1 commit: 0.0.1-0-0be33bf $ runc -v runc version 1.0.0-rc93 commit: 12644e614e25b05da6fd08a38ffa0cfe1903fdec spec: 1.0.2-dev go: go1.13.15 libseccomp: 2.5.1 $ crun --version crun version 0.19.1.45-4cc7 commit: 4cc7fa1124cce75dc26e12186d9cbeabded2b710 spec: 1.0.0 +SYSTEMD +SELINUX +APPARMOR +CAP +SECCOMP +EBPF +CRIU +YAJL
- A command used for the benchmark
-
The development of railcar has been suspended. This project was very nice but is no longer being developed. This project is inspired by it.
-
I have fun implementing this. In fact, this may be the most important.
User Documentation
This section provides documentation of youki and the sub crates that the youki repo contains for the users. So if you are using youki as a low level container runtime, or using any of the crates in youki workspace as dependencies for your own project, this section might be helpful for you.
This is divided into following sub-sections :
- Basic Setup : This explains how the dependencies and setup required to compile and run youki
- Basic Usage : This explains using youki itself as a low-level container runtime, or using one of the crates as dependencies
- crates : This section provides brief explanation of the member crates of youki repo workspace
- libcgroups
- libcontainer
- liboci-cli
- libseccomp
- Webassembly : This explains how to use webassembly module with youki.
Basic Setup
This explains the requirements for compiling Youki as a binary, to use it as a low-level container runtime, or to depend once of its crates as dependency for your own project.
Youki currently only supports Linux Platform, and to use it on other platform you will need to use some kind of virtualization. The repo itself provides Vagrantfile that provides basic setup to use Youki on non-Linux system using Vagrant. The last sub-section explains using this vagrantfile.
Also note that Youki currently only supports and expects systemd as init system, and would not work on other systems. There is currently work on-going to put systemd dependent features behind a feature flag, but till then you will need a systemd enabled system to work with Youki.
Build Requirements
As Youki is written in Rust, you will need to install and setup Rust toolchain to compile it. The instructions for that can be found on Rust's official site here.
If you installed it using rustup, the correct compiler version will be setup automatically from rust-toolchain.toml in the repo root.
Build with cross-rs
You can compile youki using cross-rs, which provides:
- Seamless compilation for different architectures (see
Cross.tomlin the repo root for the list of supported targets) - No build time dependencies (compilation runs in a container)
- No runtime dependencies when building static binaries (musl targets)
The only build dependency is cross-rs and its dependencies (rustup and docker or podman).
$ CARGO=cross TARGET=musl just youki-dev # or youki-release
Build without cross-rs
Install the build dependencies and then run:
$ just youki-dev # or youki-release
Install the build dependencies using your distribution's package manger
Debian, Ubuntu and related distributions
$ sudo apt-get install    \
      pkg-config          \
      libsystemd-dev      \
      build-essential     \
      libelf-dev          \
      libseccomp-dev      \
      libclang-dev        \
      libssl-dev
Fedora, CentOS, RHEL and related distributions
$ sudo dnf install          \
      pkg-config            \
      systemd-devel         \
      elfutils-libelf-devel \
      libseccomp-devel      \
      clang-devel           \
      openssl-devel
Runtime requirements
The static binary (musl) builds of youki have no additional runtime requirements. Otherwise you need to install the runtime requirements using your distribution's package manager:
Debian, Ubuntu and related distributions
$ sudo apt-get install libseccomp2
Fedora, CentOS, RHEL and related distributions
$ sudo dnf install libseccomp
Running youki
You can use Youki by itself to start and run containers, but it can be a little tedious, as it is a low-level container runtime. You can use a High-level container runtime, with its runtime set to Youki, so that it will be easier to use. Both of these are explained in the Basic Usage. For using it along with an high-level runtime, you will to install one such as Docker or Podman. This documentation uses Docker in its examples, which can be installed from here.
Quick install
Install from the GitHub release as root:
# curl -sSfL https://github.com/containers/youki/releases/download/v0.3.3/youki-0.3.3-$(uname -m)-musl.tar.gz | tar -xzvC /usr/bin/ youki
Getting the source
Currently Youki can only be installed from the source code itself, so you will need to clone the Youki GitHub repository to get the source code for using it as a runtime. If you are using any crates of Youki as dependency you need to do this step, as Cargo will automatically clone the repository for you.
To clone the repository, run
$ git clone https://github.com/containers/youki.git
This will create a directory named youki in the directory you ran the command in. This youki directory will be referred to as root directory throughout the documentation.
Installing the source
Once you have cloned the source, you can build it with just :
# go into the cloned directory
$ cd youki
$ just youki-dev # or youki-release
$ ./youki -h # get information about youki command
This will build the Youki binary, and put it at the root level of the cloned directory, that is in the youki/ .
Using sub-crates as dependency
To use any of the sub-crate as a dependency in your own project, you can specify the dependency as follows,
[dependencies]
...
liboci-cli = { git = "https://github.com/containers/Youki.git" }
...
Here we use liboci-cli as an example, which can be replaced by the sub-crate that you need.
Then you can use it in your source as
use liboci_cli::{...}
Using Vagrant to run Youki on non-Linux Platform
As explained before, Youki only support Linux, and to build/use it on non-Linux Platforms, you will need to use some kind of virtualization. The repo provides a Vagrantfile to do the required VM setup using Vagrant, which can be installed from here.
Once installed and setup, you can run vagrant commands in the cloned directory to run Youki inside the VM created by vagrant :
# in the youki directory

# for rootless mode, which is default
$ vagrant up
$ vagrant ssh

# or if you want to develop in rootful mode
$ VAGRANT_VAGRANTFILE=Vagrantfile.root vagrant up
$ VAGRANT_VAGRANTFILE=Vagrantfile.root vagrant ssh

# in virtual machine
$ cd youki
$ just youki-dev # or youki-release
Basic Usage
This explains using Youki as a low-level container runtime. Youki can be used by itself to create, start and run containers, but doing so can be tedious, and thus you might want to use a higher-level runtime with Youki set as its runtime, so that you can get a convenient and easy interface.
You can use Youki with Docker, or Podman, but for the purpose of the examples, we will illustrate using Docker.
Youki can run in two modes, namely rootful mode, and rootless mode. The primary difference from the user-perspective in these is that as the name suggests, rootless mode does not require root/admin permissions, while rootful mode needs the root permissions. Both of these are shown in the examples below.
Using youki with a high-level runtime
We will first see how to use Youki with a high-level runtime such as Docker. You can install Docker from here.
By default, after installation the docker sets up so that its daemon process will start running in background after booting up. By default, this configures Docker to use its default low-level runtime, and to use Youki instead , we will first need to stop the running Docker daemon.
As Youki needs systemd to compile, this assumes that you are running on a systemd based system. So you an first check if the docker daemon is running or not by running
systemctl status docker
This will print a message showing if the daemon is active or not. If it is active, then you will need to stop it by running
sudo systemctl stop docker
After this you need to manually restart the docker daemon, but with Youki as its runtime. To do this, run following command in the youki/ directory after building youki
dockerd --experimental --add-runtime="youki=$(pwd)/youki" # run in the youki/scripts directory
This will start the daemon and hang up the console. You can either start this as a background process to continue using the same terminal, or use another terminal, which will make it easier to stop the docker daemon later.
In case you don't stop the original daemon, you can get an error message after previous command
failed to start daemon: pid file found, ensure docker is not running or delete /var/run/docker.pid
Now that the docker daemon is running, you can use docker normally as you will, but you will be able to specify Youki as its low-level runtime to actually create, start and stop the containers.
You can try running a container such as
docker run -it --rm --runtime youki busybox # run a container
This will start a busybox container, and give access to terminal inside it.
After you are done, you can stop the docker daemon by sending it a signal, either by using Ctrl + C if you are running the process in another terminal, or by using kill command with the pid of it, if you have started it as a background process.
Then to start the original/normal Docker daemon, you can run
sudo systemctl start docker
Let docker permanently know youki as a runtime
With newer versions of docker, you can update file /etc/docker/daemon.json to
let docker know youki
(source).
You may need to create this file, if it does not yet exist. A sample content of it:
{
  "default-runtime": "runc",
  "runtimes": {
    "youki": {
      "path": "/path/to/youki/youki",
      "runtimeArgs": [
          "--debug",
          "--systemd-log"
      ]
    }
  }
}
After this (need to restart docker at the first time), you can use youki
with docker: docker run --runtime youki .... You can verify the runtime includes youki:
$ docker info|grep -i runtime
 Runtimes: youki runc
 Default Runtime: runc
Using Youki Standalone
Youki can also be used directly, without a higher-level runtime such as Docker to create, start, stop and delete the container, but the process can be tedious. Here we will show how you can do that, to run a simple container with desired program running in it.
Note that we will still be using Docker to generate the rootfs required for running the container.
To start, in the youki/scripts directory, make another directory named tutorial, and create a sub-directory rootfs inside it
mkdir -p tutorial/rootfs
After that, you will need to use docker to create the required directory structure
cd tutorial
docker export $(docker create busybox) | tar -C rootfs -xvf -
This will create the required directory structure for using it as a root directory inside the container.
Now the any container runtime gets the information about the permissions, configurations and constraints for the container process by using a config.json file. Youki has a command which can generate the default config for you. To do this, run
../youki spec
After this, you can manually edit the file to customize the behavior of the container process. For example, to run the desired program inside the container, you can edit the process.args
"process": {
...
"args": [
  "sleep", "30"
],
...
 }
Here you can change the args to specify the program to be run, and arguments to be given to it.
After this, go back to the youki/ directory
cd ..
As the setup is complete, you can now use youki to create the container, start the container, get its state etc.
# create a container with name `tutorial_container`
sudo ./youki create -b tutorial tutorial_container

# you can see the state the container is `created`
sudo ./youki state tutorial_container

# start the container
sudo ./youki start tutorial_container

# will show the list of containers, the container is `running`
sudo ./youki list

# delete the container
sudo ./youki delete tutorial_container
The example above shows how to run Youki in a 'rootful' way. To run it without root permissions, that is, in rootless mode, few changes are required.
First, after exporting the rootfs from docker, while generating the config, you will need to pass the rootless flag. This will generate the config withe the options needed for rootless operation of the container.
../youki spec --rootless
After this, the steps are basically the same, except you do not need to use sudo while running youki.
cd ..
./youki create -b tutorial rootless_container
./youki state rootless_container
./youki start rootless_container
./youki list
./youki delete rootless_container
Log level
youki defaults the log level to error in the release build. In the debug
build, the log level defaults to debug. The --log-level flag can be used to
set the log-level. For least amount of log, we recommend using the error log
level. For the most spammy logging, we have a trace level.
For compatibility with runc and crun, we have a --debug flag to set the
log level to debug. This flag is ignored if --log-level is also set.
Crates provided
Youki repo itself is a Cargo workspace, comprising of several sub-crates, each one for some specific functionality. The youki binary depends on this to provide the low-level functionality, and you can use these crate as a dependency for your own projects as well.
For more information on how to add a sub-crate as a dependency in your project, see Basic Usage.
The subsection in this part briefly explains some of the crates, and some of the functionality they expose. This should be good enough to get a general idea of each crate. To get detailed information about the structs, functions and modules each crate exposes, unfortunately, for the time being, you will need to go through the source itself, but we are working on creating better docs.
libcgroups
libcgroups is the crate that contains functionality to work with Linux cgroups. This provide an easy to use interface over reading and writing cgroups files, as well as various structs that represent the cgroups data.
The modules that it exposes are :
- common
- stats
- systemd
- test_manager
- v1
- v2
Following is a short explanation of these modules.
common
This module contains functionality that is general to any type of cgroup. Some of the things it provides are:
-
trait
CgroupManagerwhich gives and interface for the following:- add a task to a cgroup
- apply resource restriction
- remove a cgroup
- control freezer cgroup state
- get stats from a cgroup
- get pids belonging to the cgroup
-
functions
write_cgroup_file_strandwrite_cgroup_filewhich write data to a cgroup file -
function
read_cgroup_filewhich reads data from given cgroup file -
function
get_cgroup_setup_with_rootwhich returns setup of cgroups (v1,v2, hybrid) on the system with specified cgroup root path -
function
get_cgroup_setupwhich returns setup of cgroups (v1,v2, hybrid) on the system with default cgroup root path/sys/fs/cgroup -
function
create_cgroup_manager_with_rootwhich returns corresponding cgroup manager on the system with specified cgroup root path, if the passedroot_pathargument isNone, then it's same as functioncreate_cgroup_manager -
function
create_cgroup_managerwhich returns corresponding cgroup manager on the system with default cgroup root path/sys/fs/cgroup
stats
This module has functionalities related to statistics data of the cgroups, and structs representing it.
Some of the things it exposes are
-
struct
Statswhich contains following structs:-
CpuStats: contains cpu usage and throttling information -
MemoryStats: contains usage of memory, swap and memory combined, kernel memory, kernel tcp memory and other memory stats -
PidStats: contains current number of active pids and allowed number of pids -
BlkioStats: contains block io related stats, such as number of bytes transferred from/to a device in cgroup, number of io operations done by a device in cgroup, device access and queue information etc. -
HugeTlbStats: containing stats for Huge TLB such as usage, max_usage, and fail count
-
-
function
supported_page_sizewhich returns hugepage size supported by the system -
utility functions to operate with data in cgroups files such as:
-
parse_single_value: reads file expecting it to have a single value, and returns the value -
parse_flat_keyed_data: parses cgroup file data which is in flat keyed format (key value) -
parse_nested_keyed_data: parses cgroup file data which is in nested keyed format (key list of values) -
parse_device_number: parses major and minor number of device
-
systemd
This is the module used by youki to interact with systemd, and it exposes several functions to interact:
-
function
bootedto check if the system was booted with systemd or not -
module
controller_type, which contains enumControllerTypewhich is used to specify cgroup controllers available on a system -
module
manager, which containsManagerstruct, which is the cgroup manager, and contain information such as the root cgroups path, path for the specific cgroups, client to communicate with systemd etc. This also implementsCgroupManagertrait, and thus can be used for cgroups related operations. -
module
dbus-nativeis the native implementation for dbus connection, which is used to interact with systemd in rootless mode.
test_manager
This exposes a TestManager struct which can be used as dummy for cgroup testing purposes, which also implements CgroupManager.
v1 and v2
These two modules contains functionalities specific to cgroups version 1 and version 2. Both of these expose respective cgroup managers, which can be used to manage that type of cgroup, as well as some utility functions related to respective cgroup version, such as get_mount_points (for v1 and v2), get_subsystem_mount points (for v1), and get_available_controllers (for v2) etc.
The v2 module also exposes devices module, which provides functionality for working with bpf, such as load a bpf program, query info of a bpf program, attach and detach a bpf program to a cgroup, etc.
libcontainer
This crate provides functionality for creating and managing containers. Youki itself uses this crate to manage and control the containers.
This exposes several modules, each dealing with a specific aspect of working with containers.
-
apparmor: functions that deal with apparmor, which is a Linux Kernel security module to control program capabilities with per program profiles. -
capabilities: this has functions related to setting and resetting specific capabilities, as well as to drop extra privileges from container process. -
config: this exposesYoukiConfigstruct, which contains a subset of the data in theconfig.json. This is the subset that is needed when starting or managing containers after creation, and rather than parsing and passing around wholeconfig.json, the smallerYoukiConfigis passed, which is comparatively faster. -
container: This is the core of the container module, and contains sub-modules and structs that deal with the container lifecycle including creating, starting, stopping and deleting containers. -
hooks: exposes functionrun_hooks, which is used to run various container lifecycle hooks as specified in oci-spec. -
namespaces: exposesNamespacesstruct, which deals with applying namespaces to a container process. -
notify_socket: this containsNotifyListenerstruct, which is used internally to communicate between the main youki process and the forked container processes. -
process: a module which exposes functions related to forking the process, setting up the namespaces and starting the container process with correct namespaces. -
rootfs: this contains modules which deal with rootfs, which is minimal filesystem that is provided to the container. -
user_ns: this deals with running containers in with new user namespace, usually rootless containers will use this, that is running containers without needing root permissions. -
seccomp: this deals with setting up seccomp for container process. It uses libseccomp crate in order to do that. -
signal: this provides simple wrappers for unix signal, so that parsing them from their names or signal numbers is easier. -
syscall: this provides a traitSyscall, which is used to abstract over several functionalities which need to call libc functions. This allows the other parts of library to use those functions without having to deal with implementation details. -
tty: this deals with setting up the tty for the container process. -
utils: provides various utility functions, such asparse_envto parse the env variables,get_cgroups_path,create_dir_all_with_modeetc.
liboci-cli
This module provides the structs for command line arguments for OCI container runtimes as specified in the OCI Runtime Command Line Interface. The exposed structures derive clap::Parser, so that they can be directly used for parsing oci-commandline arguments.
Implemented subcommands
| Command | liboci-cli | CLI Specification | runc | crun | youki |
|---|---|---|---|---|---|
| create | ✅ | ✅ | ✅ | ✅ | ✅ |
| start | ✅ | ✅ | ✅ | ✅ | ✅ |
| state | ✅ | ✅ | ✅ | ✅ | ✅ |
| kill | ✅ | ✅ | ✅ | ✅ | ✅ |
| delete | ✅ | ✅ | ✅ | ✅ | ✅ |
| checkpoint | ✅ | ✅ | |||
| events | ✅ | ✅ | ✅ | ||
| exec | ✅ | ✅ | ✅ | ✅ | |
| list | ✅ | ✅ | ✅ | ✅ | |
| pause | ✅ | ✅ | ✅ | ✅ | |
| ps | ✅ | ✅ | ✅ | ✅ | |
| restore | ✅ | ✅ | |||
| resume | ✅ | ✅ | ✅ | ✅ | |
| run | ✅ | ✅ | ✅ | ✅ | |
| spec | ✅ | ✅ | ✅ | ✅ | |
| update | ✅ | ✅ |
libseccomp
This crate provides Rust FFI bindings to libseccomp. This is adapted from code generated using rust-bindgen from a C header file. This also manually fixes some of the issues that occur as rust-bindgen has some issues when dealing with C function macros.
Webassembly
There are 3 things you need to do to run a WebAssembly module with youki.
- Build youki with wasm-wasmer feature flag enabled
- Build a container image with the WebAssembly module
- Run the container with youki
Build youki with wasm-wasmedge, wasm-wasmer, or wasm-wasmtime feature flag enabled
-
Run
build.shwith-f wasm-wasmedgeoption../scripts/build.sh -o . -r -f wasm-wasmedge -
Run
build.shwith-f wasm-wasmeroption../scripts/build.sh -o . -r -f wasm-wasmer -
Run
build.shwith-f wasm-wasmtimeoption../scripts/build.sh -o . -r -f wasm-wasmtime
Build a container image with the WebAssembly module
If you want to run a webassembly module with youki, your config.json has to include either runc.oci.handler or module.wasm.image/variant=compat".
It also needs to specify a valid .wasm (webassembly binary) or .wat (webassembly test) module as entrypoint for the container. If a wat module is specified it will be compiled to a wasm module by youki before it is executed. The module also needs to be available in the root filesystem of the container obviously.
"ociVersion": "1.0.2-dev",
"annotations": {
    "run.oci.handler": "wasm"
},
"process": {
    "args": [
        "hello.wasm",
        "hello",
        "world"
    ],
...
}
...
Compile a sample wasm module
A simple wasm module can be created by running
rustup target add wasm32-wasi
cargo new wasm-module --bin
cd ./wasm-module
vi src/main.rs
fn main() {
    println!("Printing args");
    for arg in std::env::args().skip(1) {
        println!("{}", arg);
    }

    println!("Printing envs");
    for envs in std::env::vars() {
        println!("{:?}", envs);
    }
}
Then compile the program to WASI.
cargo build --target wasm32-wasi
Build a container image with the module
Create a Dockerfile.
vi Dockerfile
FROM scratch
COPY target/wasm32-wasi/debug/wasm-module.wasm /
ENTRYPOINT ["wasm-module.wasm"]
Then build a container image with module.wasm.image/variant=compat annotation. 1
sudo buildah build --annotation "module.wasm.image/variant=compat" -t wasm-module .
Run the wasm module with youki and podman
Run podman with youki as runtime. 1
sudo podman --runtime /PATH/WHARE/YOU/BUILT/WITH/WASM-WASMER/youki run localhost/wasm-module 1 2 3
You might need sudo because of #719.
Community
Current Maintainers
| Name | Role | GitHub ID |
|---|---|---|
| Toru Komatsu | Committer | @utam0k |
| Thomas Schubart | Committer | @Furisto |
| Yashodhan | Committer | @YJDoc2 |
| Eric Fang | Committer | @yihuaf |
| Sascha Grunert | Committer | @saschagrunert |
| Jorge Prendes | Committer | @jprendes |
Code of Conduct
Youki follows the CNCF Code of Conduct.
Maintainership
Youki is governed by Maintainers who are elected from active contributors. Youki will remain vendor-neutral. Maintainers are here.
Roles
Maintainers consist of the following roles:
-
Committer (Full maintainership)
Committers have full write accesses to repos. Committers’ commits should still be made via GitHub pull requests (except for urgent security fixes), and should not be pushed directly to the default branch. -
Reviewer (Limited maintainership)
Reviewers may moderate GitHub issues and pull requests (such as adding labels and cleaning up spams), but they do not have any access to merge pull requests nor push commits. A Reviewer is considered as a candidate to become a Committer.
Addition and promotion of Maintainers
A contributor who have made significant contributions in quality and in quantity can be directly invited as a Committer. A proposal to add or promote a Maintainer must be approved by 2/3 of the Committers who vote within 7 days. Voting needs a minimum of 2 approvals. The proposer can vote too. Votes from the same company will be counted as one vote. A proposal should be made via a GitHub pull request to the file containing the list of Maintainer defined above. Before submitting the pull request, the proposer should reach out to the Committers to check their willingness to support the proposal.
Removal and demotion of Maintainers
A Maintainer who do not show significant activities for 12 months, or, who violated the Code of Conduct, may be demoted or removed from the project.
A proposal to demote or remove a Maintainer must be approved by 2/3 of the Committers (excluding the person in question) who vote within 14 days. Voting needs a minimum of 2 approvals. The proposer can vote too. Votes from the same company will be counted as one vote.
A proposal should be made via a GitHub pull request to the file containing the list of Maintainer defined above. In the special case of removing a harmful Maintainer, this process can take place via a private discussion. Before submitting the pull request, the proposer should reach out to the Committers to check their willingness.
Contributing
Developer Certificate of Origin
Every commit must be signed off with the Signed-off-by: REAL NAME <email@example.com> line.
Use the git commit -s command to add the Signed-off-by line.
Licensing
Youki is licensed under the terms of Apache License 2.0.
Sending pull requests
Pull requests can be submitted using the GitHub standard process.
Merging pull requests
Committers can merge pull requests. A Committer shouldn’t merge their own pull requests without approval by at least one other Committer.
Developer Documentation
This section of the documentation is more oriented towards those who wish to contribute to youki, and contains more information and resources about the working and implementation of it. So if you are thinking of helping, this is a great place to start with.
Also, Thank you! If you have any issues or doubts, you can ask them on youki's discord server here.
This section is split into following parts
-
Basics : This contains general resources and information that you wold need to work with any parts of youki.
-
Unwritten Rules : This is the part to make them written! This will contain conventions and rules that were discussed and decided in PRs or just commonly followed when developing.
-
Good Places to Start : This section will contain some suggestions about the areas that will be a good place to start for new contributors.
-
Crate specific Information : This is split into one sections for each crate, and will contains information and resources specific for that crate.
Happy Contributing!
Basics
This section has the general information and resources needed to work with any part of youki. As youki is written in Rust, you should know some basic Rust before. If you don't yet, some good resources for that can be found on the Rust's official site.
Youki
Youki is a low level container runtime, which deals with the creation and management of Linux containers. Some of other such low-level runtimes are runc and crun. These are usually used by a higher-level runtime such as Docker or Podman to actually create and manage containers, where the higher level runtime provides a much easier interface for users.
Before you start working on developing youki, you should go through the User documentation as it specifies the requirements and setup for running youki. For developing youki, you will need to install the dependencies and clone the repo, as specified in the Basic Setup and Basic Usage sections.
Testing while developing
While developing youki, you might need to compile and test the code from time to time, to make sure it is working and and something is not accidentally broken. Currently there are two ways to verify that:
- Unit tests, which test individual components of youki
- Integration tests, which test the complete functionality of youki commands from start to end.
As the steps to run these tests can be a bit tedious, a makefile in project the root provides an easy way to run these quickly. The makefile currently states three individual test :
- test: The unit tests
- oci-integration-test: The integration tests provided by OCI, these are the current standard to make sure youki is OCI compliant.
- integration-test: This is the Rust port of the OCI runtime tests, as there are some issues in the OCI tests. See integration_test page.
All three can be run by using make test-all, or you can run the individual command to run specific tests.
Resources
OCI
Open containers initiative is project, which provides a standardization and standardized specification for operating-system-level virtualization. That way components that confirm to the specification provided by OCI spec, can interoperate with each other easily, and developing of new applications becomes easier. For example youki can be used inplace of runc in Docker, as all three : Docker, runc and youki are OCI compliant, and have a standard interface.
Their main GitHub page is at https://github.com/opencontainers, and more information about the runtime specifications can be found at https://github.com/opencontainers/runtime-spec/blob/master/runtime.md.
As youki needs to deal with a lot of low level programming interfaces of Linux Kernel, another good place know is the online man pages project, which can be found at https://man7.org/. Man pages provide detailed information about the programming interfaces of various features of Linux Kernel. You can simply search man <feature-name> using a search engine, or you can search at the site itself, at https://man7.org/linux/man-pages/index.html. These can be very helpful to know about the behavior and usage of and reasoning behind various kernel features used throughout youki.
Happy developing!!!
Unwritten Rule
This is the place to write down rules or conventions that were discussed in PRs, so that newcomers can easily find them, without having to go through the PR history. So if you decide on any convention to follow for the project, please make sure to add them here.
Conventions to follow
Errors
Youki currently uses anyhow library to deal with errors occurring during its execution. So wherever you use fallible actions, or functions that can return Result, make sure you attach enough information with the errors so that error logs can be useful for debugging later. For example, if you are reading a file, or parsing something and the operation does not succeed, you can add the path from which you attempted to read the file, or the string that you attempted to parse.
Also for the error messages, we follow the convention all small-case letters and no period at the end, as discussed in this PR. Whenever you write error messages, please follow this convention to keep them uniform.
Logs
youki uses log crate to log information while running. Whenever adding code to interact with system or kernel features or such, make sure to add debug logs so that if youki crashes, you can trace the errors and zero-in on the reasons using logs.
Comments
Make sure that you comment copiously, and explain the peculiar behavior of your code so that others can understand why certain code is written the way it is. Also make sure to add doc comments and examples for pub items in the crates, so that users can find it from the docs generated by cargo doc.
Scripts
In any script, any makefile etc, make sure to set -e at the start. This will abort the script after any command fails, rather than continuing with incorrect state and creating knock-on errors.
Update This Documentation
Keep this Documentation updated! Make sure you add any relevant doc-links and resources to this that you found helpful or contains background information required to understand the code, so that it can help newcomers as well as others to find the resources in one single place.
Good places to start
First of all, welcome to youki! Hope you have fun while developing and contributing :)
This lists some of the known places that are long-running and would be useful for beginners. But as the things under development can change any time, the best place to check are the issues on the GitHub repo. You can find issues with labels good fist issue or help wanted and start working on them.
You can also search for TODO or FIXME comments in the source, and try working on them, but not all of them are easy places to start, and some of them can be particularly tricky to fix.
This lists known parts of youki that can be good for beginners at the time of the writing. Please update as things change.
Documentation Comments
Currently youki is decently commented, and those explain most of the public facing API and structs. But there are still places which can use more doc comments, and examples showing usage, so people can use the docs generated by cargo doc as a guide.
If you don't know much about container runtime or low level system working, then this can be a good place to start. While going through the code and documenting it, you can learn about it. Make sure that you update this documentation with useful links that you found while commenting some code if it has some peculiar behavior, or it is hard to understand without knowing some background.
Integration Tests
You can find more detailed information about this in the integration_test crate, but in brief, we currently use OCI-runtime-tools provided integration tests to validate that youki is OCI spec compliant. But those are written in Go, which makes the developer depend on two language env to compile youki and test it. These tests also have some issues which makes them hard to use on some system setups.
Thus we are porting those test to Rust, so that it can be a Rust implementation of OCI-runtime integration tests, as well as be easy to run on local systems for testing. If you know Go and Rust this can be a great place to start. Check out the tracking issue.
This Documentation
This documentation is created using mdbook and aims to provide a concise reference for users and developers of youki. For more information on mdbook itself, you can check out the mdbook documentation.
Please make sure that you update this documentation along with newly added features and resources that you found helpful while developing, so that it will be helpful for newcomers.
Currently this documentation is hosted at https://containers.github.io/youki/, using GitHub pages. GitHub CI actions are used to automatically check if any files are changed in /docs on each push / PR merge to main branch, and if there are any changes, the mdbook is build and deployed to gh-pages. We use https://github.com/peaceiris/actions-mdbook to build and then https://github.com/peaceiris/actions-gh-pages GitHub action to deploy the mdbook.
When testing locally you can manually test the changes by running mdbook serve in the docs directory (after installing mdbook), which will temporarily serve the mdbook at localhost:3000 by default. You can check the mdbook documentation for more information.
If you want to test it using gh-pages on your own fork, you can use following steps in the docs directory.
git worktree prune
# Do this if you are running this command first time after booting,
# As after shutdown /tmp files are removed
git branch -D gh-pages && git worktree add /tmp/book -b gh-pages
mdbook build
rm -rf /tmp/book/* # this won't delete the .git directory
cp -rp book/* /tmp/book/
cd /tmp/book
git add -A
git commit 'new book message'
git push -f origin gh-pages
cd -
Repository Structure
This page might be the one that gets most easily outdated, as the structure might change at any time! Thus make sure to update this whenever there are any changes in the overall structure of the whole repo. For the same reason, this does not list the structure in detail but instead describes only the main directories.
.github
Contains workflows and files needed by those workflows.
crates
This is the core of youki. This contains various libraries that are developed alongside of youki and the youki binary itself.
docs
The directory where the source of this documentation resides. The source is also divided into two parts, for developers and users. Please see Documentation documentation for more information.
hack
As the name suggests, contains hack scripts for patching some issues which are currently not solvable in a straightforward way or solving issues for which we have no idea of why they occur.
Scripts
Contains scripts for various purposes, such as building youki, running integration tests etc. These might be small scripts called from many other scripts, big scripts that perform a complex task or helper scripts for the main makefile.
tests
This contains all the integration tests for validating youki. Note that these are integration tests for start-to-end testing of youki commands. Unit tests for individual parts are in their respective source files in crates.
Debugging
Since Youki uses pipe and double-fork in the creating phase, it is hard to debug what happened. You might encounter the error message, "Broken pipe ..." Unfortunately, this error message has only information that a child process exists with an error for some reason.
This section will give some tips to debug youki to know what happens in the child processes.
bpftrace
bpftrace is an eBPF based tool. In the case of youki, you can catch the system calls youki issued.
For example, if you catch write system calls, you can see the log output until the middle of process. It allows you to do something similar to print debugging.
How to debug
-
You need to install bpftrace, please refer to the official documentation to know how to install it.
-
Before running the process or comannd you want to debug, run the following command in another terminal.
You need the root privilege to run it.
$ cd ${youki_repo} $ just hack-bpftrace -
Run the command you want to debug.
For example
-
Run the bpftrace script.
$ just hack-bpftrace BPFTRACE_STRLEN=120 ./hack/debug.bt Attaching 13 probes... Tracing Youki syscalls... Hit Ctrl-C to end. TIME COMMAND PID EVENT CONTENT -
Run the Kubernetes cluster using kind with youki
$ cd ${youki_repo} $ just test-kind docker buildx build --output=bin/ -f tests/k8s/Dockerfile --target kind-bin . ... Creating cluster "youki" ... ... kubectl --context=kind-youki apply -f tests/k8s/deploy.yaml runtimeclass.node.k8s.io/youki created deployment.apps/nginx-deployment created ... kubectl --context=kind-youki delete -f tests/k8s/deploy.yaml runtimeclass.node.k8s.io "youki" deleted deployment.apps "nginx-deployment" deleted -
Returning to the first command executed, the system calls youki issued are caught and logged.
$ just hack-bpftrace
BPFTRACE_STRLEN=120 ./hack/debug.bt
Attaching 13 probes...
Tracing Youki syscalls... Hit Ctrl-C to end.
TIME                 COMMAND PID      EVENT     CONTENT
207033348942           youki 13743    open      errno=2, fd=-1, file=/opt/containerd/lib/glibc-hwcaps/x86-64-v3/libc.so.6
...
207035462044           youki 13743    open      errno=0, fd=3, file=/proc/self/exe
207035478523           youki 13743    write     fd=4, ELF
207066996623               4 13743    open      errno=2, fd=-1, file=/opt/containerd/lib/glibc-hwcaps/x86-64-v3/libc.so.6
...
207070130175               4 13743    clone3
207070418829 youki:[1:INTER] 13747    write     fd=4, {"timestamp":"2023-09-24T10:47:07.427846Z","level":"INFO","message":"cgroup manager V2 will be used","target":"libcgrou
...
207084948440 youki:[1:INTER] 13747    clone3
207085058811 youki:[1:INTER] 13747    write     fd=4, {"timestamp":"2023-09-24T10:47:07.442502Z","level":"DEBUG","message":"sending init pid (Pid(1305))","target":"libcontai
207085343170  youki:[2:INIT] 13750    write     fd=4, {"timestamp":"2023-09-24T10:47:07.442746Z","level":"DEBUG","message":"unshare or setns: LinuxNamespace { typ: Uts, path
...
207088256843  youki:[2:INIT] 13750    pivt_root new_root=/run/containerd/io.containerd.runtime.v2.task/k8s.io/0fea8cf5f8d1619a35ca67fd6fa73d8d7c8fc70ac2ed43ee2ac2f8610bb938f6/r, put_old=/run/containerd/io.containerd.runtime.v2.task/k8s.io/0fea8cf5f8d1619a35ca67fd6fa73d8d7c8fc70ac2ed43ee2ac2f8610bb938f6/r
...
207097207551  youki:[2:INIT] 13750    write     fd=4, {"timestamp":"2023-09-24T10:47:07.454645Z","level":"DEBUG","message":"found executable in executor","executable":"\"/pa
...
207139391811  youki:[2:INIT] 13750    write     fd=4, {"timestamp":"2023-09-24T10:47:07.496815Z","level":"DEBUG","message":"received: start container","target":"libcontainer
207139423243  youki:[2:INIT] 13750    write     fd=4, {"timestamp":"2023-09-24T10:47:07.496868Z","level":"DEBUG","message":"executing workload with default handler","target"
Crate Specific Information
This section contains subsections for each individual crate in the youki workspace. Each of the subsection will have information and resources on that particular crate.
In case you are working with some specific crate, you can find resources about it in its section. Also make sure you add any resources that you find when working on them as well.
libcgroups
This crate provides an interface for working with cgroups in Linux. cgroups or control groups is a Linux kernel feature which can be used to fine-control resources and permissions given to a particular process or a group of processes. You can read more about them on the cgroups man page.
The initial version of cgroups is called the version 1 was implemented in kernel 2.6.24, and later in kernel version 4.5, a new version of cgroups was released, aimed to solve issues with v1, the version v2.
This crates exposes several functions and modules that can be used to work with cgroups :
-
Common traits and functions which are used by both v1 and v2 such as
- Trait
CgroupManager, this abstracts over the underlying implementation of interacting with specific version of cgroups, and gives functions to add certain process to a certain cgroup, apply resource restrictions, get statistics of a cgroups, freeze a cgroup, remove a cgroup or get list of all processes belonging to a cgroup. v1 and v2 modules both contain a version specific cgroup manager which implements this trait, and thus either can be given to functions or structs which expects a cgroup manager, depending on which cgroups the host system uses. - Apart from the trait, this also contains functions which help with reading cgroups files, and write data to a cgroup file, which are used throughout this crate.
- Functions to detect which cgroup setup (v1, v2 or hybrid) is on the host system with/without specified mounted cgroup root path, as well as functions to get the corresponding cgroups manager w/o cgroup root path.
- Trait
-
Functions and structs to get and store the statistics of a cgroups such as
- CPU stats including usage and throttling
- Memory stats including usage of normal and swap memory, usage of kernel memory, page cache in bytes etc
- Pid stat including current active pids and maximum allowed pids
- Block IO stats such as number of bytest transferred to/from a device in the cgroup, io operations performed by a device in the cgroup, amount of time cgroup had access to a device etc
- Huge TLB stats such as usage and maximum usage etc.
- Function to get pid stats
- Function to get supported hugepage size
- Function to parse flat keyed data and nested keyed data that can be in a cgroups file
- Parse a device number
-
Cgroups V1 module which deal with implementing a cgroup manager for systems which have cgroups v1 or hybrid cgroups
-
Cgroups V2 module which deal with implementing a cgroup manager for systems which have cgroups v2
As youki currently depends on systemd as an init system, this crate also exposes module systemd, which provides interface for working with systemd related operations. systemd resource control is a good place to read more about systemd and its involvement in resource control.
Dbus Native
This module is the native implementation of dbus connection functionality used for connecting with systemd via dbus. Refer to this issue discussion following for the discussion regarding moving away from existing dbus-interfacing library.
Note that this implements the minimal required functionality for youki to use dbus, and thus does not have all the dbus features.
-
Refer to see dbus specification and header format for the individual specifications.
-
For systemd interface and types, you can generate the following file and take help from the auto-generated functions
dbus-codegen-rust -s -g -m None -d org.freedesktop.systemd1 -p /org/freedesktop/systemd1, see https://github.com/diwic/dbus-rs
libcontainer
This crate is one of the core crates of the youki workspace, and has functions and structs that deal with the actual craetion and management of the container processes.
Remember, in the end, a container is just another process in Linux, which has control groups, namespaces, pivot_root and other mechanisms applied to it. The program executing has the impression that is is running on a complete system, but from the host system's perspective, it is just another process, and has attributes such as pid, file descriptors, etc. associated with it like any other process.
Along with the container related functions, this crate also provides Youki Config, a subset of the OCI spec config. This config contains only the essential data required for running the containers, and due to its smaller size, parsing it and passing it around is more efficient than the complete OCI spec config struct.
Other than that, this crate also provides a wrapper over basic Linux sockets, which are then used internally as well as by youki to communicate between the main youki process and the forked container process as well as the intermediate process.
This crate also provides an interface for Apparmor which is another Linux Kernel module allowing to apply security profiles on a per-program basis. More information about it can be found at https://apparmor.net/.
Notes
Some other modules expose by this crate are
- rootfs, which is a ramfs like simple filesystem used by kernel during initialization
- hooks, which allow running of specified program at certain points in the container lifecycle, such as before and after creation, start etc.
- signals, which provide a wrapper to convert to and from signal numbers and text representation of signal names
- capabilities, which has functions related to set and reset specific capabilities, as well as to drop extra privileges
- tty module which daels with providing terminal interface to the container process
- pseudoterminal man page : Information about the pseudoterminal system, useful to understand console_socket parameter in create subcommand
Executor
By default and traditionally, the executor forks and execs into the binary
command that specified in the oci spec. Using executors, we can override this
behavior. For example, youki uses executor to implement running wasm
workloads. Instead of running the command specified in the process section of
the OCI spec, the wasm related executors can choose to execute wasm code
instead. The executor will run at the end of the container init process.
The API accepts only a single executor, so when using multiple executors, (try wasm first, then defaults to running a binary), the users should compose multiple executors into a single executor. The executor will return an error when the executor can't handle the workload.
Namespaces : namespaces provide isolation of resources such as filesystem, process ids networks etc on kernel level. This module contains structs and functions related to applying or un-applying namespaces to the calling process
Note: clone(2) offers us the ability to enter into user and pid namespace by creating only one process. However, clone(2) can only create new pid namespace, but cannot enter into existing pid namespaces. Therefore, to enter into existing pid namespaces, we would need to fork twice. Currently, there is no getting around this limitation.
Pausing and resuming
Pausing a container indicates suspending all processes in it. This can be done with signals SIGSTOP and SIGCONT, but these can be intercepted. Using cgroups to suspend and resume processes without letting tasks know.
The following are some resources that can help understand with various Linux features used in the code of this crate
- oom-score-adj
- unshare man page
- user-namespace man page
- wait man page
- pipe2 man page : Definition and usage of pipe2
- Unix Sockets man page : Useful to understand sockets
- prctl man page : Process control man pages
liboci-cli
This crate was separated from original youki crate, and now contains a standalone implementation of structs needed for parsing commandline arguments for OCI-spec compliant runtime commandline interface. This is in turn used by youki to parse the command line arguments passed to it, but can be used in any other projects where there is need to parse OCI spec based commandline arguments.
This primarily uses the crate clap-v3 for parsing the actual commandline arguments given to the runtime.
You can refer to OCI Commandline interface guide to know more about the exact specification.
libseccomp
Seccomp is a linux kernel feature that allows a process a one-way transition into secure mode, where restrictions are applied to the syscalls the process can make, as well as restrictions on the file descriptors. Specifically, it can exit, sigreturn and read/write already open file descriptors. This way the process can be isolated and restricted on how it interacts with rest of the system on a kernel level.
This crate does not actually implement any particular feature, but provides Rust FFI bindings for seccomp module. These are primarily generated by using rsut-bindgen on seccomp C header file, and then manually fixed where any issues were found. More information about seccomp can be found in its man page.
youki
This is the core crate that contains the youki binary itself. This provides the user interface, as well as binds the other crates together to actually perform the work of creation and management of containers. Thus, this provides implementation of all the commands supported by youki.
The simple control flow of youki can be explained as :

When given the create command, Youki will load the specification, configuration, sockets etc., and use clone syscall to create an intermediate process. This process will set the cgroups and capabilities, and then fork to the init process. Reason to create this intermediate process is that the clone syscall cannot enter into existing pid namespace that has been created for the container. Thus first we need to make a transition to that namespace in the intermediate process and fork that to the container process. After that the main youki process is requested the uid and gid mappings, and after receiving them the intermediate process sets these mapping, fork the init process and return pid of this init process to the main youki process before exiting.
The init process then transition completely into the new namespace setup for the container (the init process only transitions the pid namespace). It changes the root mountpoint for the process using pivot_root, so that the container process can get impression that it has a complete root path access. After that the init process sets up the capabilities and seccomp, and sends the seccomp notify fd to the main youki process. When the seccomp agent running on the host system sets up the seccomp profile, it notifies the init process, after which it can execute the programto be executed inside the container. Thus the init process then sends ready notification to the main youki process, and waits for the start signal.
The main youki process which started creating the container, when receives the ready signals update the pid file of the container process and exits. This concludes the creation of the container.
To start the container, when youki start it executed along with the container id, start signal is sent to the waiting container init process, and the the youki process exists.
When the init process receives the start signal, it execs the program to be run in the container, and then exits.
Notes
The main youki process will set up pipes used as message passing and synchronization mechanism with the init process. The reason youki needs to create/fork two process instead of one is due to the user and pid namespaces. In rootless container, we need to first enter user namespace, since all other namespaces requires CAP_SYSADMIN. When unshare or set_ns into pid namespace, only the children of the current process will enter into a different pid namespace. As a result, we must first fork a process to enter into user namespace, call unshare or set_ns for pid namespace, then fork again to enter into the correct pid namespace.
e2e tests
There are various e2e tests:
-
This is youki's original integration to verify the behavior of the low-level container runtime.
-
This is the method that containerd's integration test runs with youki.
-
This is the method to run the runtime tools that OCI manages as a test tool to verify meeting the OCI Runtime Spec
Contest
This is youki's original integration to verify the behavior of the low-level container runtime.
How to run
just test-contest
How to write
We will not go into detail here, but will explain how to write and add a new test case based on an example test.
Fully the code of the example test
use anyhow::{Context, Result};
use oci_spec::runtime::{ProcessBuilder, Spec, SpecBuilder};
use test_framework::{test_result, Test, TestGroup, TestResult};

use crate::utils::test_inside_container;

////////// ANCHOR: get_example_spec
fn create_spec() -> Result<Spec> {
    SpecBuilder::default()
        .process(
            ProcessBuilder::default()
                .args(
                    ["runtimetest", "hello_world"]
                        .iter()
                        .map(|s| s.to_string())
                        .collect::<Vec<String>>(),
                )
                .build()?,
        )
        .build()
        .context("failed to create spec")
}
////////// ANCHOR_END: get_example_spec

////////// ANCHOR: example_test
fn example_test() -> TestResult {
    let spec = test_result!(create_spec());
    test_inside_container(spec, &|_| Ok(()))
}
////////// ANCHOR_END: example_test

////////// ANCHOR: get_example_test
pub fn get_example_test() -> TestGroup {
    let mut test_group = TestGroup::new("example");
    let test1 = Test::new("hello world", Box::new(example_test));
    test_group.add(vec![Box::new(test1)]);

    test_group
}
////////// ANCHOR_END: get_example_test-
Build the OCI Runtime Spec you want to verify
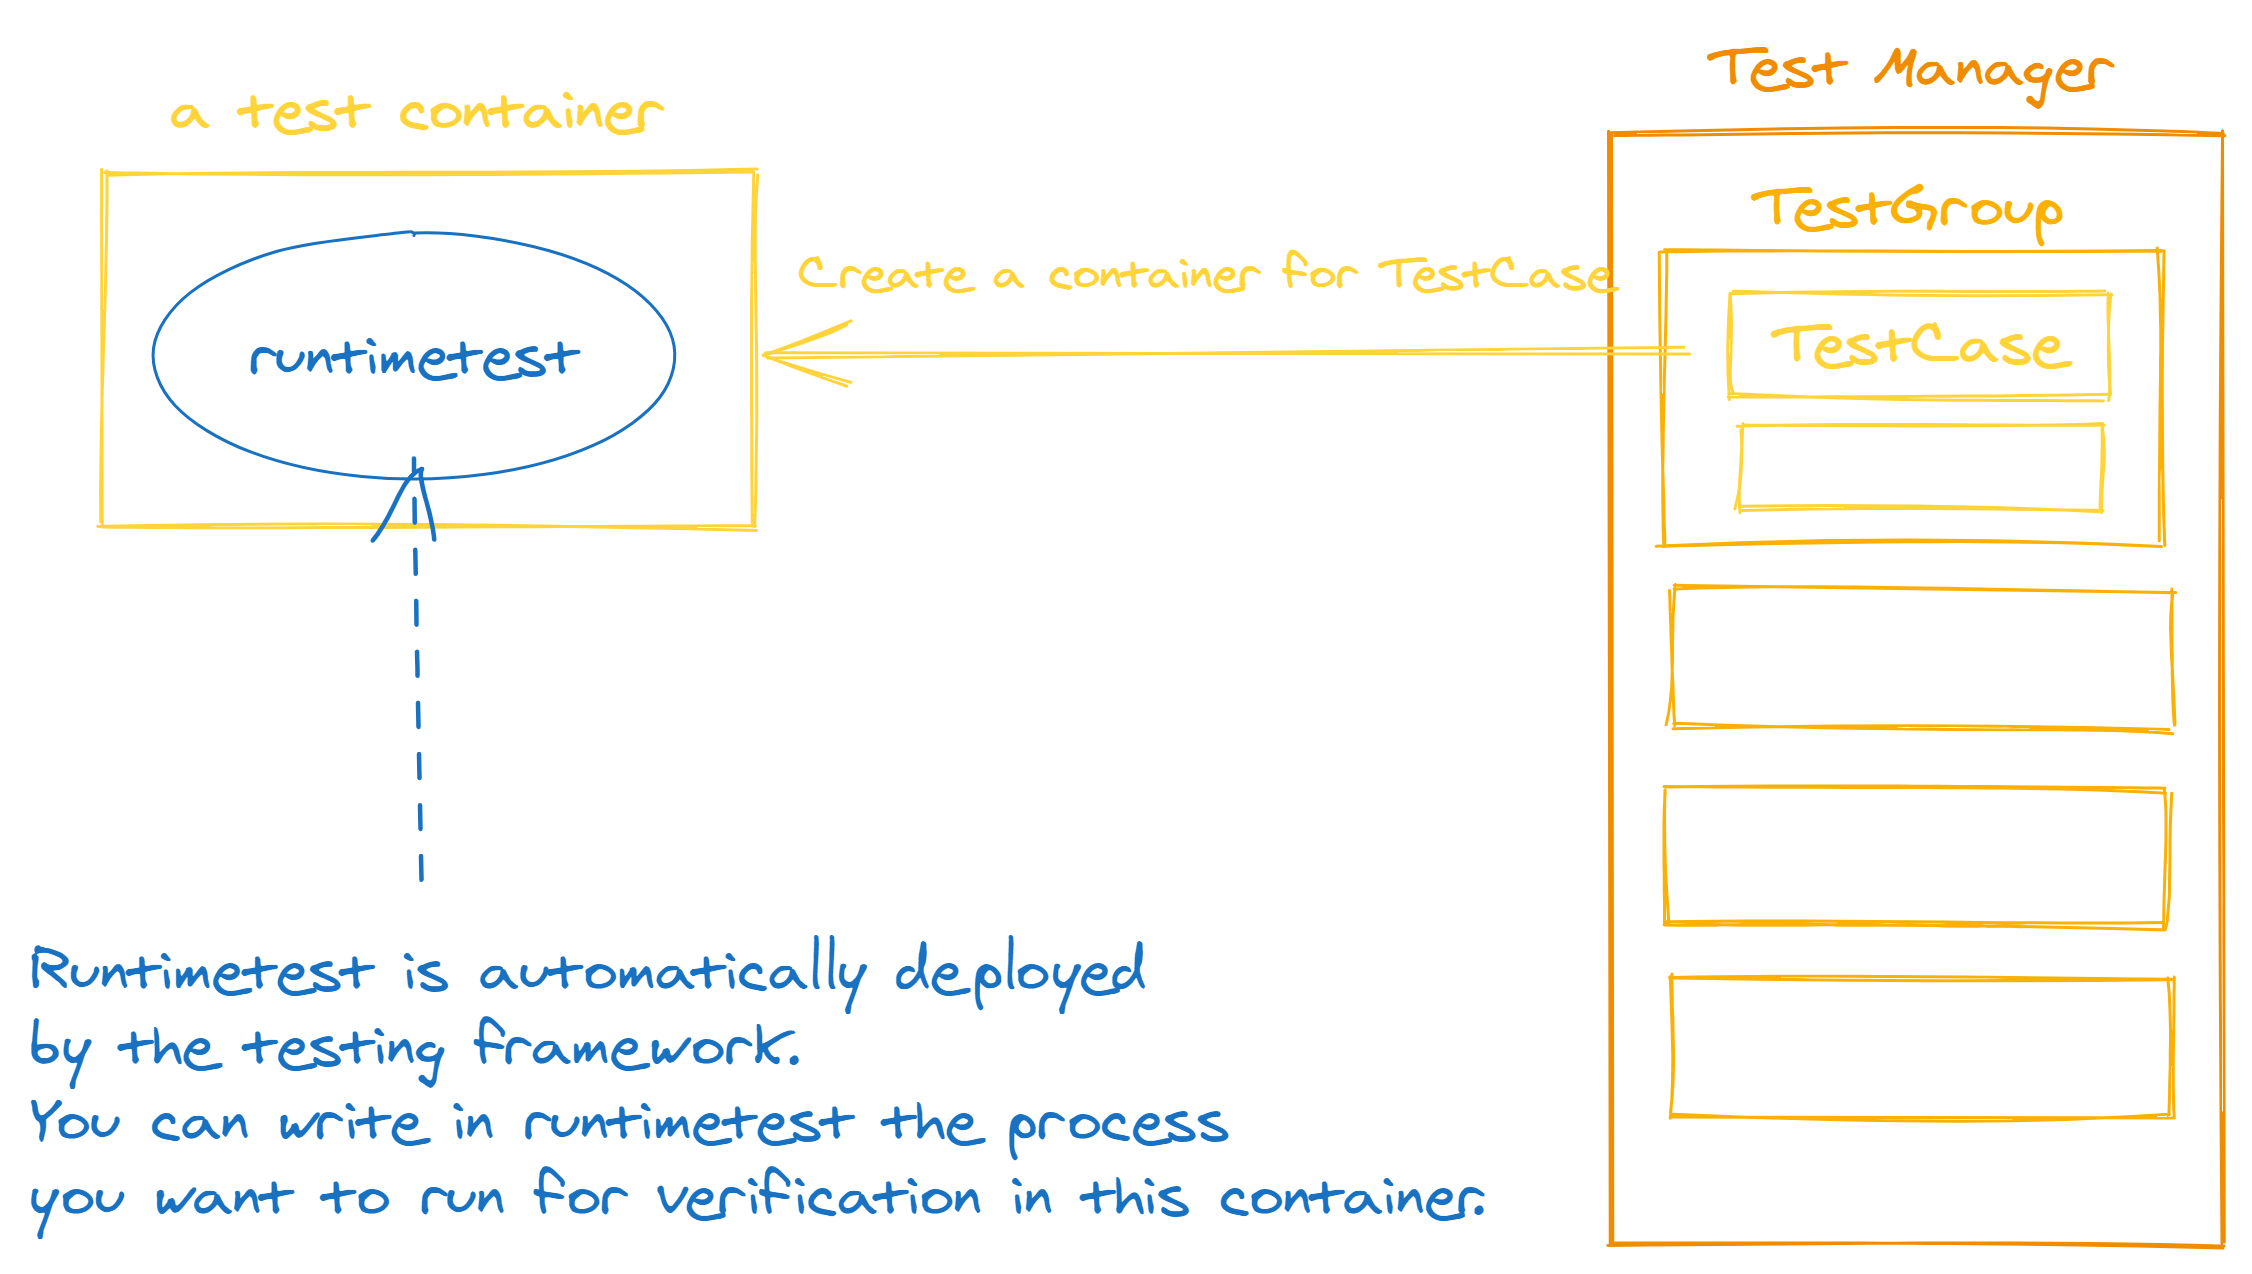
This testing framework automatically places runtimetest in the container. In other words, you can test the processes you want to execute within a container by writing them in runtimetest. Therefore, it is common practice here to write an OCI Runtime Spec that executes
runtimetest.
fn create_spec() -> Result<Spec> {
    SpecBuilder::default()
        .process(
            ProcessBuilder::default()
                .args(
                    ["runtimetest", "hello_world"]
                        .iter()
                        .map(|s| s.to_string())
                        .collect::<Vec<String>>(),
                )
                .build()?,
        )
        .build()
        .context("failed to create spec")
}- Prepare a function that returns a
TestResult, which represents the result of the test.
fn example_test() -> TestResult {
    let spec = test_result!(create_spec());
    test_inside_container(spec, &|_| Ok(()))
}- Create a
TestGroupand register a test case you created
pub fn get_example_test() -> TestGroup {
    let mut test_group = TestGroup::new("example");
    let test1 = Test::new("hello world", Box::new(example_test));
    test_group.add(vec![Box::new(test1)]);

    test_group
}- Register the
TestGroupyou created to aTestManager
    let mut tm = TestManager::new();
    let example = get_example_test();
tm.add_test_group(Box::new(example));- Write the validation you want to run within a test container
fn main() {
    let spec = get_spec();
    let args: Vec<String> = env::args().collect();
    let execute_test = match args.get(1) {
        Some(execute_test) => execute_test.to_string(),
        None => return eprintln!("error due to execute test name not found"),
    };

    match &*execute_test {
        "hello_world" => tests::hello_world(&spec),
pub fn hello_world(_spec: &Spec) {
println!("Hello world");
}integration_test
Note that these tests resides in /tests/integration_test/ at the time of writing.
This crate contains the Rust port of OCI-runtime tools integration tests, which are used to test if the runtime works as per the OCI spec or not. Initially youki used the original implementation of these test provided in the OCI repository here. But those tests are written in Go, which made the developers depend on two language environments Rust and Go to compile youki and test it. The Validation tests themselves also have an optional dependency on node js to parse their output, which can make it a third language dependency.
Other than that, those tests also showed some issues while running on some local systems, and thus running the tests would be difficult on local system. As the runtime is a complex piece of software, it becomes useful to have a set of tests that can be run with changes in code, so one can verify that change in one part of youki has not accidentally broken some other part of youki.
Thus we decided to port the tests to Rust, and validate them, so that we have a set of unit tests as well of integration tests to validate the working of runtime. These tests are still under development, and you can check the tracking issue for more details. More details on working of these tests can be found at https://github.com/containers/youki/tree/main/crates/integration_test.
As these tests are under development, these are validated on a standard runtime such as runc in the GitHub CI, so validate the tests themselves.
Notes
About the create container function
The test_utils provides a create_container function which can be used to run the youki create command. It returns the child process struct, which can be either wait() or wait_with_output() to wait for it finishing. Unless you know what are you doing, it is recommended to call wait() on it, as otherwise the process will hang. As explained in the youki docs , the youki create process, after starting forks, and the forked process keeps waiting for another youki process to send it the start signal , and after receiving it, that forked process execs the container program. If you are simply trying to create a container, such as in case of test_outside_runtime then calling wait_with_output() will cause it to hang. If you are actually going to start a container, and need output from the container process, then you must keep the Child struct returned by create function and call wait_with_output() on it AFTER you have called the start command on that container, which will give you the stdout and stderr of the process running inside the container.
To understand how this works, take a look at handling stdio of the runc, specially the detached pass-through mode section. As explained in it, we setup the stdio for the original youki process in youki create by setting the stdio to Stdio::piped() in the create function. Then we set the terminal option to false (which is the default anyway) in the spec, which makes it run in the pass-through mode. Then when the create process is done its work, and its forked process is waiting for the start signal, it uses the same stdio pipes. Thus calling wait_with_output() without starting will keep it hanged up, and after calling start, stdio of the program to be run inside the container can be obtained from the youki create's process.
How test inside container works
We use test_inside_container for making sure that the restrictions and constraints are uphold from inside the container process.
For that, first whichever integration test needs to use it, must define the runtimetest as the container process in the spec, and then use test_inside_container function. It requires a function which will do the necessary setup for the tests that are to be run inside. Then the counterpart for the test should be added to the runtimetest crate, which will run inside the container and if there is any error, print it to the stderr. The test_inside_container function will wait for the tests to be over and then check the stderr to be empty. If it is not, the test is assumed to fail.
test_framework
Note that these tests resides in /tests/test_framework at the time of writing.
This crate contains the testing framework specifically developed for porting the OCI integration test to rust. This contains structs to represent the individual tests, group of tests and a test manager that has responsibility to run tests. This Also exposes traits which can be used to implement custom test structs or test group structs if needed.
By default the test groups are run in parallel using the crossbeam crate, and the default test_group implementation also runs individual tests parallelly.
Sometimes you might need to run the tests in a test group serially or in certain order, for example in case of testing container lifecycle, a container must be created and started before stopping it. In such cases, you will need to implement the respective traits on your own structs, so that you can have fine control over the running of tests. Check the readme of the test_framework crate to see the struct and trait documentation here.
Runtime Test
Note that these tests resides in /tests/runtimetest at the time of writing.
This crate provides a binary which is used by integration tests to verify that the restrictions and constraints applied to the container are upheld by the container process, from inside the container process. This runs the tests one-by-one, and the failing test prints the error to the stderr.
Notes
This binary must be compiled with the option of static linking to crt0 given to the rustc. If compiled without it, it will add a linking to /lib64/ld-linux-x86-64.so . The binary compiled this way cannot be run inside the container process, as they do not have access to /lib64/... Thus the runtime test must be statically linked to crt0.
While developing, originally this was added to the common workspace of all crates in youki. But then it was realized that this was quite inefficient because :
- All packages except runtimetest will be compiled with dynamic linking
- Runtimetest will be compiled with static linking
Now runtimetest needs at least oci-spec and nix package for its operations, which are also dependencies of other packages in the workspace. Thus both of these, and recursively their dependencies must be compiled twice, each time, once for dynamic linking and once for static. The took a long time in the compilation stage, especially when developing / adding new tests. Separating runtimetest from the workspace allows it to have a separate target/ directory, where it can store the statically compiled dependencies, and the workspace can have its target/ directory, where it can store its dynamically compiled dependencies. That way only the crates which have changes need to be compiled (runtimetest or integration test), and not their dependencies.
In case in future this separation is not required, or some other configuration is chosen, make sure the multiple compilation issue does not arise, or the advantages of new method outweigh the time spent in double compilation.
To see if a binary can be run inside the container process, run
readelf -l path/to/binary |grep "program interpreter"
[Requesting program interpreter: /lib64/ld-linux-x86-64.so.2] means that the binary is not statically linked, and cannot be run inside the container process. If the above command gives no output, that means it does not require any program interpreter and can be run inside the container.
Another way is to run
file path/to/binary
./youki: ELF 64-bit LSB pie executable, x86-64, version 1 (SYSV), dynamically linked, interpreter /lib64/ld-linux-x86-64.so.2, BuildID[sha1]=...., for GNU/Linux 3.2.0, with debug_info, not stripped`
This output indicates that the binary is dynamically linked, thus cannot be run inside the container process
./runtimetest: ELF 64-bit LSB executable, x86-64, version 1 (GNU/Linux), statically linked, BuildID[sha1]=...., for GNU/Linux 3.2.0, with debug_info, not stripped
This output indicates that the binary is statically linked, and can be run inside the container process
Some links to help :
- how to generate static executable
- understanding the error which dynamically linked library gives
- Rust cargo config for rustflags
containerd integration test using youki
local
just containerd-test
runtime tools
local
$ git submodule update --init --recursive
$ just test-oci